Archive for the ‘Try This!’ Category
Try This! A Cross Friction Rub to Help Healing 4/3/2016
While going back through my posts, I found this tip hidden in the text: a cross friction rub.
The cross friction rub is a wonderful tip that was given to me by my first Seattle Physical Therapist, Travis Orth. The cross friction rub is done by applying friction perpendicular to the tissue that is in pain for approximately 1-2 minutes. Only apply enough pressure to feel like you are applying friction across the area as the tissue will likely be tender to the touch. The purpose of the friction is to help to increase healing in a tendon/ligament, particularly one that is inflamed and has been diagnosed with tendonitis.
After the cross friction rub, it is a good idea to ice the area. When using ice on your body, you may rub a cube of ice over the area: never stop moving the ice and stop after 2 minutes or when the area becomes numb. Or take a bag of ice covered with a towel and apply it to the area for 15 min being sure to check your skin. Ice can burn your skin – especially the ice packs. Regular ice has less of a chance of burning your skin because it melts on contact, but ice packs are more likely to cause skin burns because the chemicals inside the pack do not melt. As long as you keep this in mind and move the ice or ice pack regularly, the chance of ice burn is relatively low.
In my case, I have worked on my Posterior Tibial Tendons on my right and left ankles. After a run that has left my PTTs slightly inflamed (most runs, actually), I give myself a cross friction rub because it always makes the tendons feel so much better. I do not usually ice my PTT because the ankles have less circulation and another physical therapist, Brian Crosier, recommended that I try allowing the feet and ankles to go through the normal inflammation cycle. I find that it is the same with or without ice in that area.
Note: This method does not work on all tendons/ligaments. For example, the Illiotibial Band (or IT Band) that has been diagnosed as having tendonitis, does not usually respond to the cross friction rub, although it probably won’t hurt you to try it. In addition, if you have bursitis and are trying to “work it out” by massage or cross friction rub, most likely it will only get worse as bursitis is an irritation of a bursa (a small fluid filled sack that provides cushioning around bones and ligaments). Massaging an inflamed bursa will only make it more inflamed. So, if you want to be sure you are on a ligament or tendon, check the location of the pain to look for a possible bursa (in joints of shoulder, hips, knees and elbows). This website has great illustrations: Bursitis – Mayo Clinic.
Update on Spring 5/29/15
Posted by admin in Training (running, cycling, etc.), Try This! on March 30th, 2016
As I get ready for my grand summer of training, I figure I should reflect on what has been happening with regard to run training, bike training, and how the Whidbey Island 10K went.
So, my training for Whidbey was not super smooth, but I did get a PR! I beat my 2014 time by almost 1 minute 🙂
2014 10K results: total time 1:05:02
2015 10K results: total time 1:04:13.
I ran using the ProKinetics insoles. I had been having trouble with my Achilles tendon on my right leg and Posterior Tibial Tendons in both right and left legs on runs over 4 miles. I stopped once at 2 miles to do a cross friction rub (by the way, awesome way to trick your brain into releasing tendons or muscles!), again at 3 miles, then approximately every .5 miles until the end of the run – more frequent stops if uphills are involved. However, in the race I ran through the pain and made it the entire race without stopping, which is how I got my PR.
After the race, I have not been able to run without pain – anything over 2 miles. Did not stop me from trying to maintain a running regime
Also, side note:
I took the extra 3mm build-ups that come with the ProKinetics and put them in my bike shoes (that are clipless), and suddenly, I felt that I could actually put my big toes down in my shoes. In addition, my knee quit “wobbling” when I pedal. Kind of like magic. More on that later….
Now, I am back in physical therapy. More changes, Brian has moved onto an adventure through Ecuador – I hope he starts a blog! So, this week I worked with a new PT because the burning in my calf got to be very bad, and a massage made it very apparent that I have an inflamed soleus. Really terrified of rupturing my soleus. Nasty little muscle to heal.
Turns out that it is my insertion point for my Achilles tendon that is inflamed. So, no running. Lots of stretching and some exercises. And have to keep my head up. Hardest part. Not motivated to do the exercises because they are the eccentric motion that I have done before and not felt a lot of benefit. Bleh. Have to get going, but really sad.
Why injured? Overuse….I ramped up too fast, again. Smart training is key. More research and a plan needed. Definitely should have a plan.
I’m BAAACK! The Next Phase Plan and a Half-marathon!
Posted by admin in Appointments, Try This! on February 1st, 2015
It has been a while since that second triathlon (a.k.a. my last post). In that time, I have finished 4 sprint triathlons, one 10K and two 200 mile bicycle rides (Seattle to Portland (STP) and Ride from Seattle to Vancouver and Party (RSVP))! The reason that all of my triathlons have been sprint distance is in large part due to my run. Specifically, my Posterior Tibial Tendon (PTT) continues to give me pain in distances longer than 4 miles.
Here’s the puzzle: last year in May of 2014, I trained up to and ran a 9 mile training run, which is the longest distance I have ever completed, and I did it without pain. How? I have no idea, and it didn’t last long because quickly after that run, I upped my training with a sprint focused run group with the goal of speeding up my runs and increased mileage on the bicycle rides to accommodate the upcoming STP. Thus, I ended up in the Physical Therapists office with inflamed PTT. Needless to say, I did not complete the sprint speed training nor have I run 9 miles since.
So, why start the blog again? Because on my last visit to Brian Crosier, my Physical Therapist, he unlocked two final pieces to my puzzle, I think, and I want to document this next part of my journey.
In December 2014, I had started training up to a half-marathon, the Whidbey Island Half-Marathon on April 19, 2015, from 2 mile runs. All was great until I started running 3.5 miles and my PTT got inflamed. I also started to feel my tight right hip tighten even more. Hip tightness is a new thing that started over the summer after my STP ride with my untried new awesome carbon fiber frame bicycle, but I can tell you that story another time.
S0, I entered Brian’s office with mildly achy PTT and a fairly tight hip. As he was trying to figure out how to help me since I had already been through PTT treatment, and I was already applying the techniques he had taught me over the summer, he discovered an immobility that he had not considered treating before: my mid-foot.
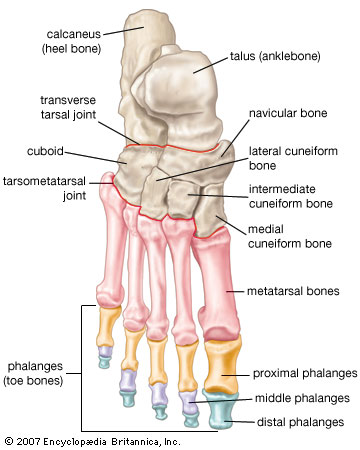
So, after Brian got the foot model, much like the picture above, he began by telling me about the three arches in the foot. There is the major arch that everyone knows about, then there is an arch on the outside of your foot between your heel and your midfoot, and finally, your toe knuckles are supposed to be an arch, but most people’s are flat and not arched at all. Hmm – I’m definitely in the flat toe knuckles camp: no surprise there.
He then added that my left big toe knuckle cannot touch the ground. I laughed and told him that my left big toe knuckle touches the ground every day 🙂 He responded by using the foot model to explain that on my left foot, my main arch compensates a lot for immobility though the mid foot or the navicular bone and the cuneiform bones, meaning it flexes or “falls” in order to allow my left big toe knuckle to touch the ground because those bones do not flex enough on their own. Consequently, the Posterior Tibial Tendon attaches to the navicular bone, which means that my PTT is already being stretched out everytime I flex my arch.
Whoa! What? When Brian told me this, so many issues that I have been having my ENTIRE life began to fall into place. I have always felt like I walk on the outside of my feet, and I have these weird outer foot calluses to prove it. Also, Brian had been coaching me to land “flat” with my feet (i.e. land mid foot with by toe and outer foot touching at the same time) because I land on the outside of my feet then roll in, which puts a lot of pressure on the PTT since it is in charge of the downward/flex motion of the big arch. Well, I have been trying to land “flat” since summer 2014, and I was not feeling very successful. Guess why – I can’t. I physically cannot get that big toe on either foot (the left is worse, but the right foot suffers as well). Finally, when I ride my bicycle, even after a fancy fitting with the spacers placed to help get my knee in the correct place, I always felt that I could not get my big toes down inside the shoes. Of course NOT! I felt so much better knowing that despite my trying and failing, it was a mechanical restraint.
But with me, I’m not satisfied with just the why. I want to know the next step – how do I correct this? Of course, Brian did not disappoint! He had invented a stretch for those small, largely immobile bones of the midfoot. Â I will post a video soon with details on how to do this stretch. For now, know that after the first stretch with Brian, the tops of my feet were sore (both left and right) for two days, and the stretch is not very big. It is just that that part of my foot had never really been stretched.
Another component of the foot issue is how to get the big toes on each foot to touch the ground while still maintaining as much subtalar neutral (ankle being neutral and arch not fallen) as possible? This took convincing – Brian suggested ProKinetics® insoles that have 3mm build-up under the big toe area on each foot (see red part on the photo below). As most of you know, if you have read very much of my blog, I do NOT like inserts of any kind. After working for over a year to get out of prescription orthotics, I am not very enthused about having to use any kind of inserts again. However, Brian made a compelling point: with these inserts, my feet could possibly be placed into a better position that would allow more natural functioning with less pressure on the PTT. Hmmmmm….why does he always make such good arguments?
So, I got the ProKinetics® Insoles. They have a 3mm build-up (in red) under the big toe as well as a removeable (yell0w) arch support. In addition, they come with an extra set of 3mm build ups (orange) in case you would like a 6mm build up.

ProKinetics Insoles
Since lots of my shoes are more minimal (Five Fingers and Luna Sandals), I also purchased a really cool adhesive lift that you stick directly to the ball of your big toes called SoleMateâ„¢ Comfort MicroLiftsâ„¢. Very cool products.
I am still in the test phase of running with full insoles, but so far the first run has been good, and I wore theSoleMateâ„¢ Comfort MicroLiftsâ„¢ with my cycling shoes today and what a difference! I know what the bike fitters have been telling me about using my whole foot – I could actually do it! My inner thighs are going to be very sore since I can access their power now, too!
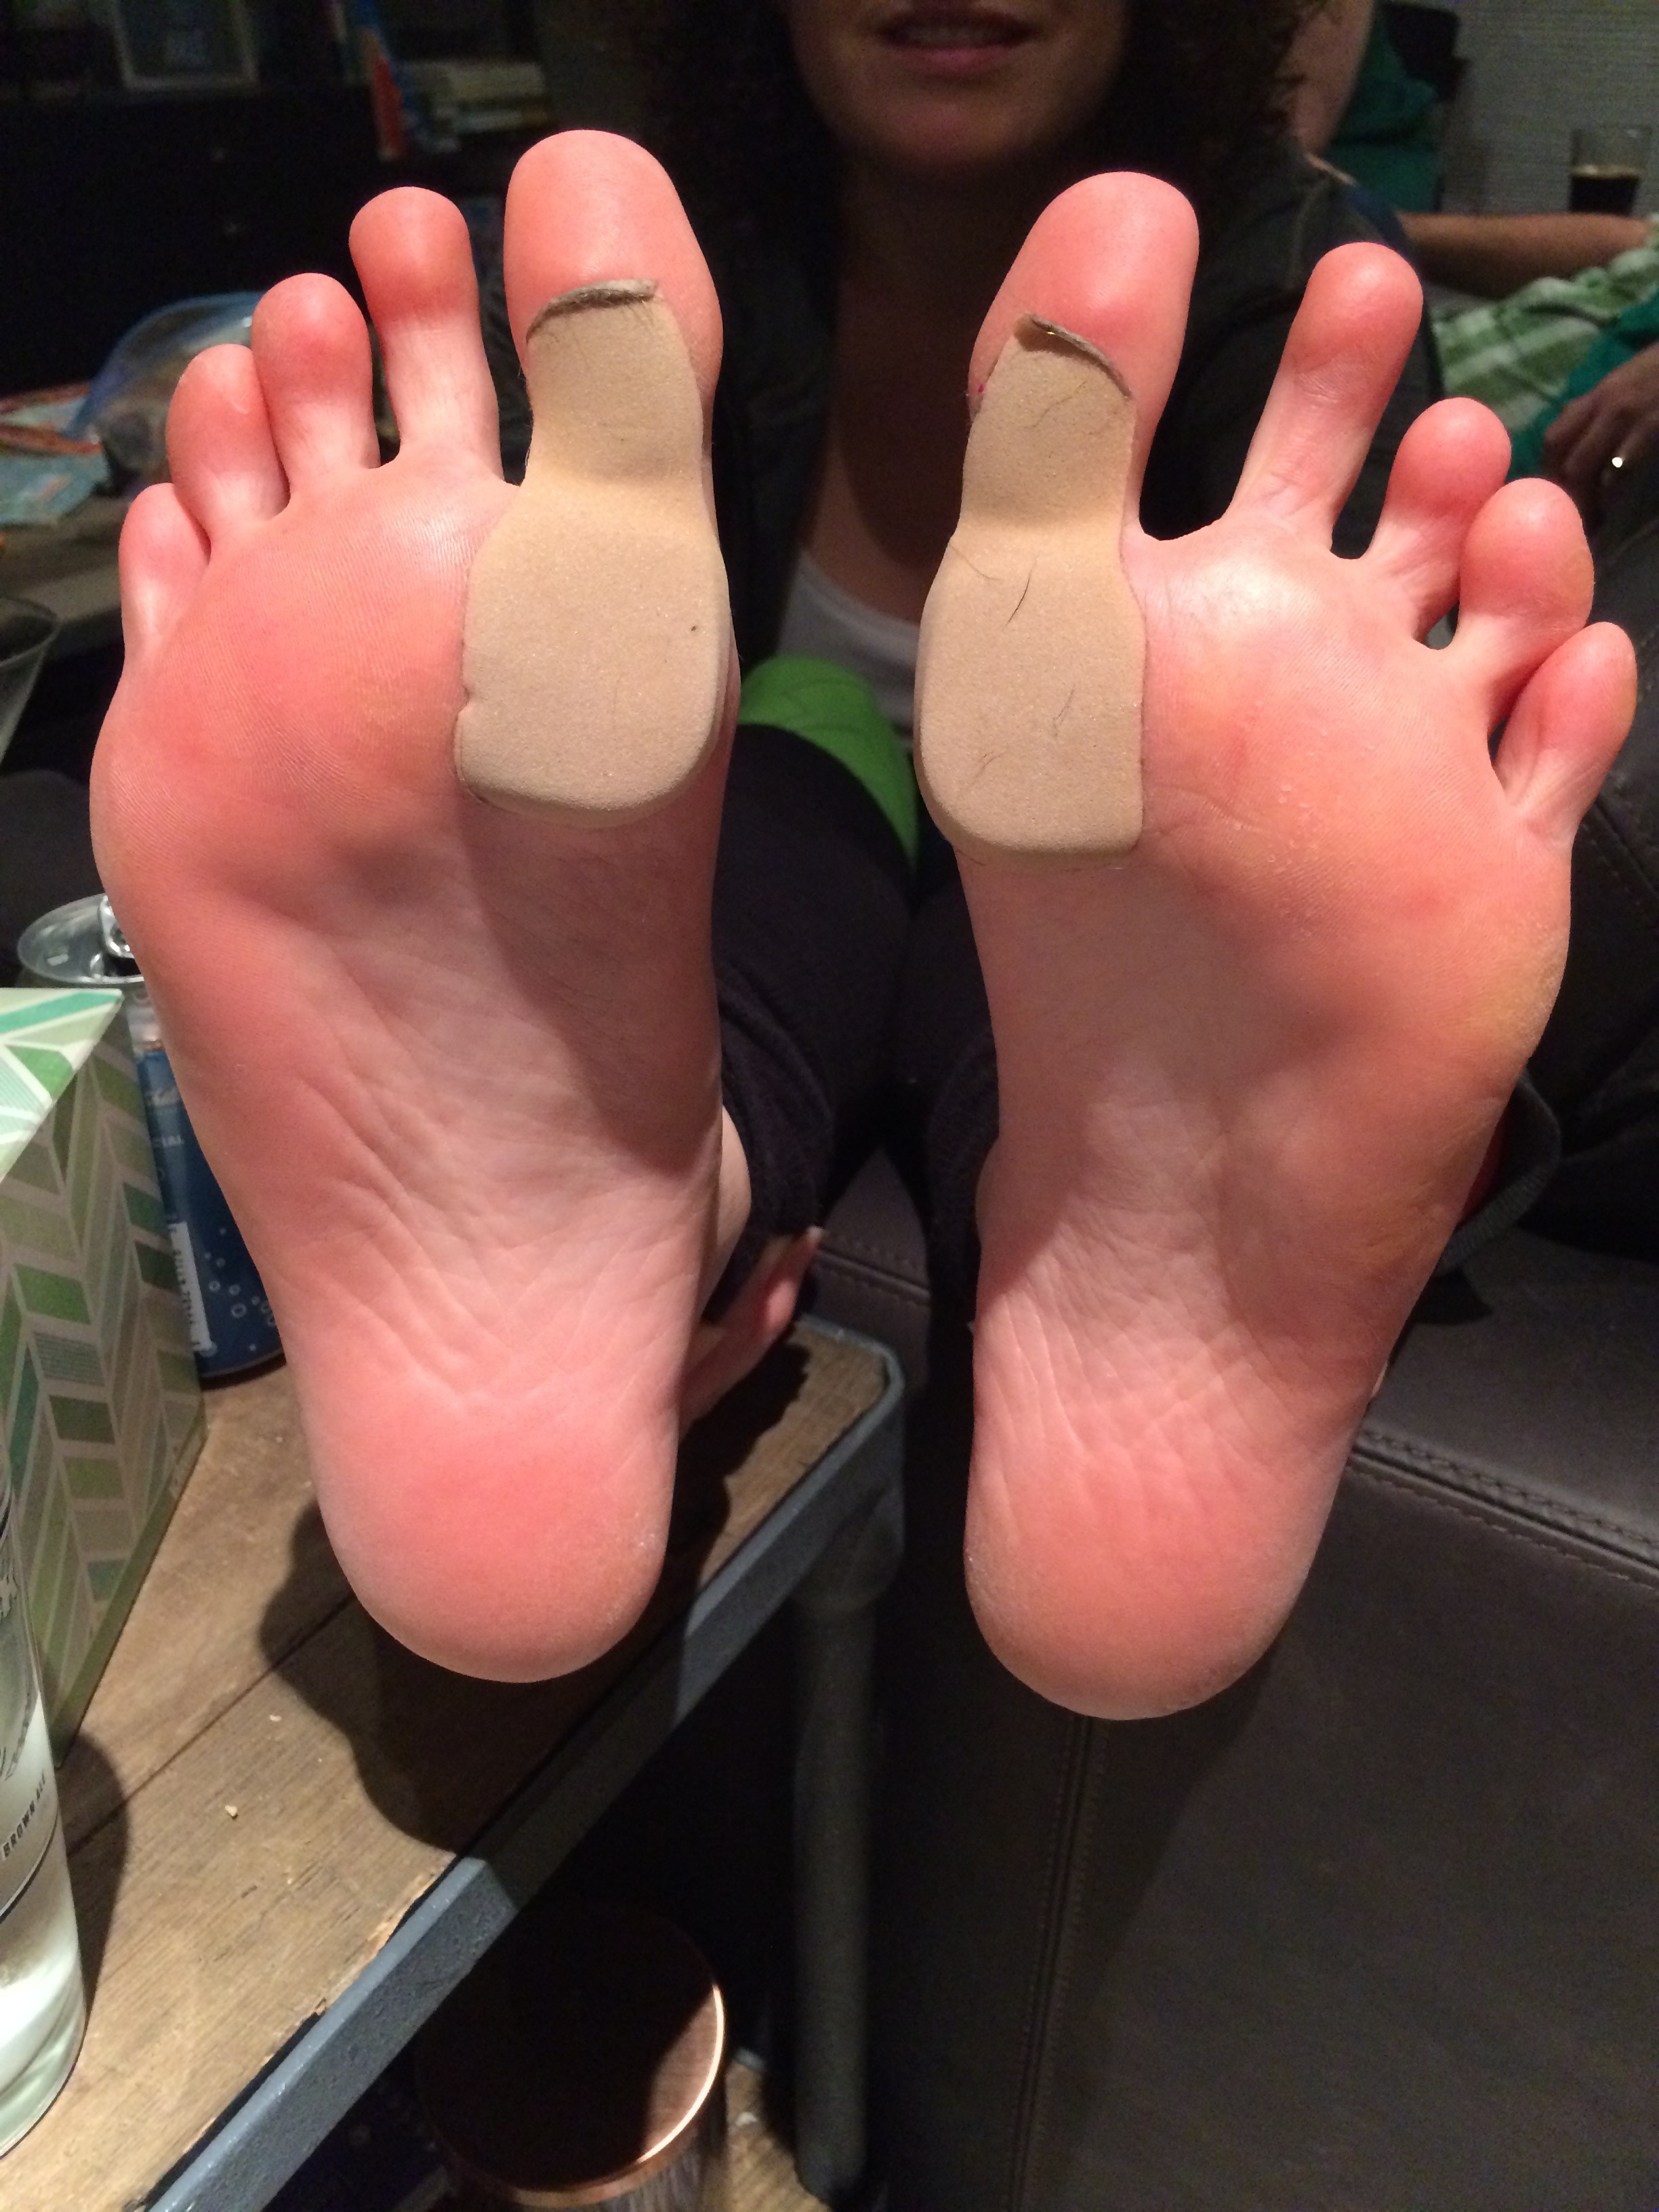
The picture shows how the SoleMateâ„¢ Comfort MicroLiftsâ„¢ look and adhere to your foot. Weird, but very effective. I will say that I wore them for my trainer ride on my bicycle, and I put them back on my feet after my shower and wore them for approximately 8 more hours. Around hour six, I could tell that the skin under the adhesive was getting  a little irritated. However, when I removed it I did not have any lasting redness or raw places. The website says that these can be stuck directly to the inside of the shoes, too. So, I’m going to try that to see how it works. Definitely adding the additional 3mm orange pieces to the bicycle shoes, though!
Part two: tight hip
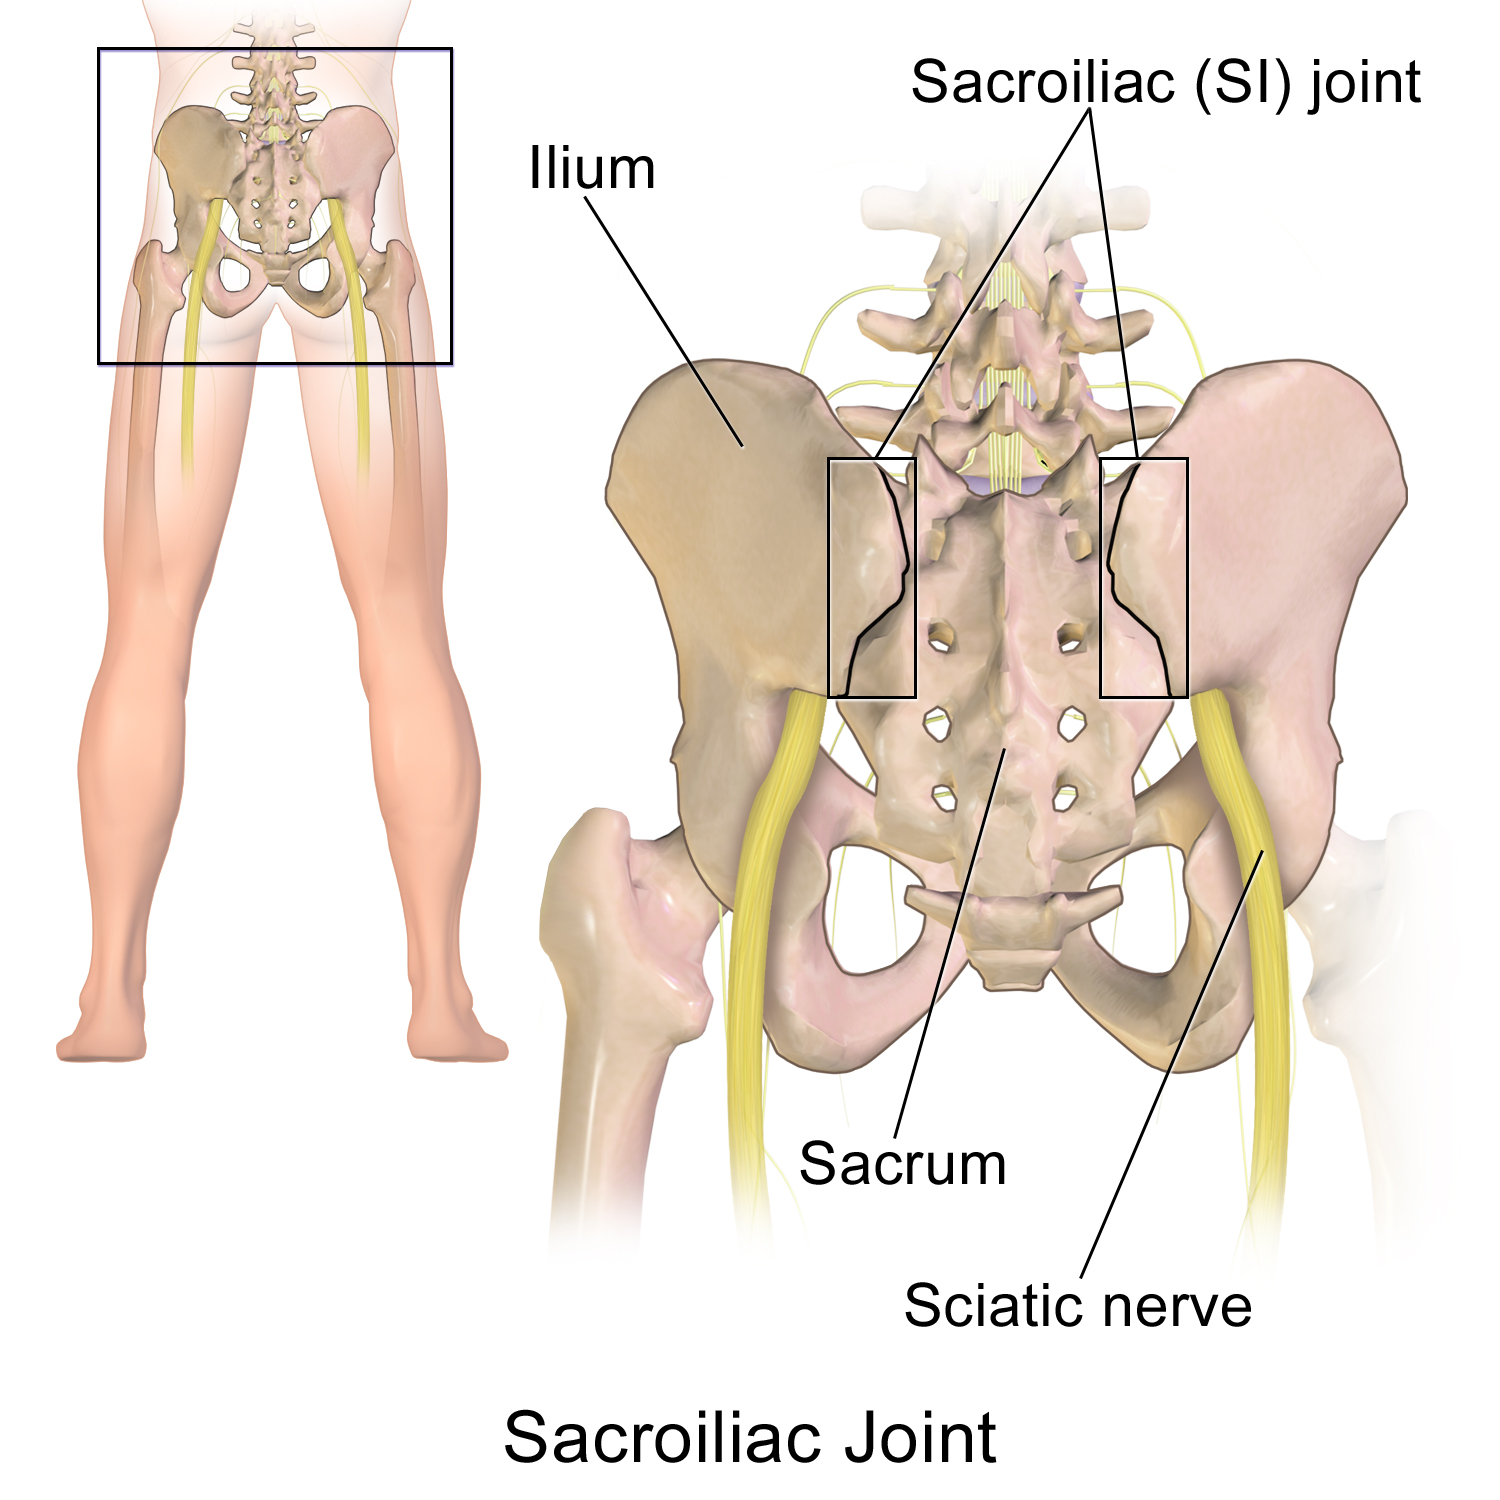
The why – my Sacroiliac (SI) joint on the right side, as seen in the photo below, was tight, which was impeding my ability to do some rotation and other movements, and my hip muscles, specifically the gluteus minimus, were taking up the slack and ending up overworked and tight.Â
 Once again, bells were going off all over the place! YES! The SI joint was tight on the right side! Of course, a few years ago I had spent an entire summer using a lacrosse ball on the right SI joint when Brian had suggested that I tuck my tail bone when I run in order to use more core muscles and attain a more efficient running form. I had not really thought much about my tail bone once it had stopped hurting, but I had never really treated it. Well, SI joint, those days are done. I am not going to neglect you anymore.
The how on treating the SI joint? To have Dr. Larry, my wonderful Chiropractor, do his magic on the SI joint when I visit him and to re-start some tennis ball massages on the SI joint. Also, I have a massage therapist, Brad, who has been working on my right hip. He will be better able to attack the problem with the new information as well. Gotta love having a village to keep it all working smoothly!
So, this is the next phase – unlock mobility in my midfoot and loosen up the SI joint on the right side. I’m still signed up for that half-marathon in April, and I’m looking forward to the training! If I can find the right combo of mechanical advantage and training pace, I may just make that race! Stay tuned!
9/29/12- Correct Toesâ„¢: An Informational Post

Erin's Feet Correct Toes 9/24/12
I have recently (as in starting Monday of this past week (9/24/12 or so)), started wearing my Correct Toesâ„¢ daily. I had a tough time with them at first: I could only comfortably wear them for approx. 1 hour, then the tops of my feet would start to ache. I would remove them, and try again in the evening. Same thing, after one hour, ache, take off.
Finally, I started trying to sleep in them. The first few nights, I would remove them at some point during my sleep. Sometimes, I found them hurled across the room. I guess my subconscious self was not so happy about these toe spreaders. After probably 5 or so nights, I would wake up with them still on! Cool!
Now, I am able to wear them almost all day (probably 8 hours comfortably in a row with my Lunaâ„¢ sandals. Then a several hour break and more wearing. I sleep in them every night, too.
Why am I doing this? Well, the Correct Toesâ„¢ were developed by a podiatrist in Portland, OR, Dr. Ray McClanahan. According to his website, “You were born with perfect feet.” And you were! 🙂 The Correct Toesâ„¢ are supposed to help undo all of the damage that modern shoe wearing does such as correct: bunions, plantar fasciosis, hammertoes and more!
Going back to the comment that you were born with perfect feet. Let’s look at baby feet to see how they look before ever meeting footwear:
 Although this picture could be better (might update it), it does show the wrinkles on the bottom of her foot really well. Now, take a minute and look at your hand….
First, feel your palm. The skin should feel slightly different than your arm: a little leathery or tough. If you use your hands a lot, you might find rough callouses. You will see all of the lines that a palm reader uses to predict your future. Regardless of how accurate that may be, those lines show how often you bend your palm in order to make that pattern of lines. The baby’s foot has deep lines as well because she can still curl her toes and really bend her feet.
Now, look at your feet…..
Maybe feel the skin on your feet. Does it feel like your hand? Is it softer than your hand? Tougher? Does it have callouses? In looking at your feet, do you see any lines like the ones on your hand? Or is your foot somewhat line free?
If your feet have lines, good job! You have flexibility in your feet, and you probably can pick things up using your feet. Cool! No lines? Don’t worry, you can fix that. 🙂 Lines in your feet are healthy and indicate a foot that has good flexibility and is allowed to flex regularly.
Shoes with stiff soles tend to inhibit foot movement. Thus, stripping the foot of its lines.
Correct Toesâ„¢ comes into this process by helping you correctly realign your toes. See on the baby’s foot how she can splay her big toe out, and how her little toe is not even touching its neighbor? Those are “correct toes!” Her feet have not been shaped by shoes and tight toe boxes.
I am in the process of reclaiming my nonexistent baby feet. By wearing Correct Toesâ„¢, I hope to accomplish toes that don’t have to touch their neighbors as well as feet that are flexible and have good lines. I think I am well on my way.
If you are brave, post your foot pictures and tell me about your foot story! I’d love to hear it 🙂
9/11/12 – A Momentous Day, PT and Chiropractic Work
Posted by admin in Training (running, cycling, etc.), Try This! on September 17th, 2012
On September 11th, 2001, I was still in graduate school at Georgia Tech. I had gotten up and was getting ready for an 8:30am class, while watching Matt Lauer and Katie Couric on the Today Show. All was well until I came back from another part of the apartment to find a burning, smoking building on the screen. At first, I thought it was a hoax. How could a building in New York City be burning? Then, Katie and Matt were taking turns trying to explain what was going on when an object hit the second World Trade Center tower. “What is happening???” I kept asking in my head as Katie and Matt continued to work on explaining a horrific scene.
On this day, my cousin also had her 16th birthday. It was not the day she would get her driver’s license, though.
This year, I had a pretty big day with a Chiropractic appointment and a physical therapy appointment.
First, I went to Dr. Larry’s. I was having a pain in my right glute max, and my thought was that it might be L5. Dr. Larry said that it sounded more like S1. So, he adjusted, and it felt great! He also did the usual neck, back hips and ankles with a little right wrist for good measure.
Then, I headed down to see Brian for physical therapy. I was wondering if it was too much to do these two things on the same day, but then I figured, why not?
I told Brian about Dr. Larry’s verdict on the S1 adjustment, and Brian said that it made a lot of sense b/c the S1 is the nerve that controls the Posterior Tibial Tendon, among other tendons in the foot. So, if you’re S1 nerve gest severed, then your Posterior Tib Tendon will not work. Hmmmm, interesting. Does that also mean that if your s1 vertebra is out of alignment, then your Posterior Tibial tendon will have a difficult time working to its fullest capacity? Good question. I do not have the answer, but it certainly does make one think.
Brian worked on ASTYM for the posterior tibial tendon and the back of the calf. Still crunchier on the right than the left. Also, I was more tender from the Iron Girl 5K. He then had me do a calf warm-up (downward dog), the World’s Greatest Stretch (coming soon), and a few running warm-up moves. These running warm-up moves included learning to hop softly for approximately one minute. The “soft hops” are shown in this video by Sanatan Golden, a PT in Portland, OR, who helps to produce “Minimalist Mondays” videos and clinics.
We then practiced foot “lifts,” which are a warm up where you try to lift your foot rather than hop from foot to foot in order to prepare for a run.
Finally, he had me run on the treadmill. This is going to be an ongoing exercise, too. Despite my reservations and rebelling against running because I am terrified of continually reinjuring myself – you know the dance: two steps forward, three steps back. However, when asked to run for a camera, I cannot say no. The following video is from Sept. 4, 2012.
Note: I had no idea Brian would suggest running that day. So, I was not dressed for success in running. Also, the creepy slow voice is Brian asking me if I am relaxed in the second video. I have some serious video editing skill deficits to overcome in the future.
I have not put the later videos together, but I might just do a video post later. For now, check this out!
In the left-most video or Video #1, I am trying very hard to remember all of the steps to running barefoot: tilt pelvis up, lift legs, head up, chest expanded, shoulders back, try to create a forward lean, etc. Notice that my legs do not always come up very far on the up swing (less than 90 degrees). In the right-most video or Video #2, Brian has showed me the first video, then told me to relax and think of being light, relaxed and quick. I also only worked on tilting my pelvis up (I had to think of something – what is this relaxed thing, anyway???).
Guess what? Relaxing and not worrying so much produced a better stride naturally. These videos were only a few minutes apart. Brian literally showed me the first video, talked about good things (thank you for doing that, I had enough negative self-talk going on for about four people at the time), and then added that I could just relax. Very well done, indeed as that second video shows. My legs swing up to 90 degrees, my pelvis is in a good place, and I might even be smiling.
Although this video is from last week, it mimics the video from 9/11/12.
So, don’t sweat the small stuff, and just relax!
9/6/12 – Physical Therapy and More!
On Thursday, I headed to PT. I wondered what we talk about that day!
They have an intern, which I love because it means that the Physical Therapist will explain what he is actually doing as he does the treatment. I do not always follow what is being said, but it is so fascinating. AND if I act interested, I get in on the explanation in layman’s terms. 😉
He was making an adjustment in one of the joints in my foot (tried to look this up, but there are so many joints that I cannot actually say which joint it was) in order to create space in the joint to help my dorsiflexion as that is the flexion that is inhibited on both of my feet and explaining the procedure to the intern. I was super fascinated, but the complex or rather the unfamiliar terms totally threw me off. It really does make me want to get a PT degree, but I’m not really interested in treating lots of different people in lots of different areas. I’m really only interested in feet.
Anyway, I learned how to do a scorpion stretch, a bridge with a leg lift that engages the core the same way that the core is engaged during a running stride, and three different ways to work the core without using the hip flexors. 1. Do a bridge on a stability ball and crunch up. By making the glutes work in the bridge, the hip flexors cannot work. Thus, only training the ab muscles and glutes. 2. Do crunches with your feet together and knees laying out to the side in a butterfly. In this position, the hip flexors absolutely cannot engage. 3. Squeeze a ball between your knees (this is what Melissa already has me do). By making the hip adductors work, the hip flexors are blocked.
Totally awesome!
Stay tuned for another aspect to my blog and more pictures and links to videos of these exercises and more!
9/5/12 – Back to the Weight Training
After taking some time off due to my gym being closed all weekend, and lets face it, my not actually wanting to go to said gym, which made the closing really convenient, it was time to get back on that wagon.
Melissa really came through, too. We talked about all of the new foot stuff, and I admitted my general laziness. So, we stuck with the new line of workout that she created after my running training. The focus is now on strengthening muscles in a functional way for running, while also actively stretching them so that my body will actually be able to reach the more natural running form, i.e., I’m working on tucking my pelvis more while running, which requires more flexibility in the hip flexors.
We got to work – side plank with hip abduction, static back lunges – I still cannot believe that I can do lunges in any form! – and an actual back lunge assisted with the stretchy bands and an opposite one arm row. Next, we hit the TRX! I love the the TRX, even though it does not always love me. She had me do assisted pushups (I rocked these guys! Also, cannot believe I can do a push up!), a really difficult side stretch and back extensions with 10 lbs! I love seeing how far I have come! This past summer has been the best and most progress in weights and overall fitness that I have ever made. I cannot wait until next summer, but I guess I should also be looking forward to the winter work, too 🙂
9/1/12 – First crash
Remember how awesome I was on my bike? Yeah, that feeling carried over to Saturday when I decided to ride my awesome self on my awesome bike to Dr. Larry’s office.
All was going well until I got behind the bus. Since there were a lot of cars, I decided to stop behind the bus as it unloaded and loaded passengers. No problem! “Unclip, then brake!”
Well, the bus looked like it was about to go. So, I reattached to the bike, started to pedal, then realized that the bus was not moving.
I braked. The bike stopped. I fell over.
Yes, I did it. The classic new clipless pedal user fall. The most embarrassing fall of them all because there is no reason except for user error. BAH!
I checked my left elbow because I wasn’t wearing sleeves, and I was sure the road had eaten it alive. Not a scratch! SWEET! My left knee was hurting, too, but since my elbow was okay, I assumed it was good, too.
I picked up my bike, put the chain back on, then thought about actually checking my knee. Blood! What? Then, I kind of felt really cool for having an injury. I finished my ride to Dr. Larry’s office, locked up my bike, and bought some large bandaids for the new cool wound.
Needless to say, having a chiropractor appointment after a crash is very well timed! He was worried about my knee, but I told him that since the adrenaline was still going, I was feeling pretty good. He adjusted my wrist, ankles, hips, full back and neck. Then, I had a massage with Jennie, who did the most amazing release on the hip flexors (or the iliopsoas) from the back. Usually, a deep release of the this muscle is from the front with the massage therapist pushing their hand down into your stomach area, following the hip bone until they reach the hip flexor muscle attachment point close to your spine. Instead,she had me lay on my stomach, and while she kept her forearm on my low back applying steady pressure on the back side, she reached up the hip bone to the hip flexor from the front side. This is a great way to release that muscle as well as get the lower back muscles to relax at the same time. I greatly enjoyed this!
After all that, I made it home on my bike without incident, but I learned to have a little more respect for it, for sure.
8/30/12 – Physical Therapy Blows My Mind
Consider my mind blown. Completely.
I was talking to the ultimate choir today. I was told that there is a podiatrist who believes in minimalist walking/running. He lives in Portland. His name is Dr. Ray McClanahan. Wow! That took me a second.
Also, a physical therapist, Sanatan Golden, in Portland (might have a funny TV show based on stereotypes in that town, but I believe Portland is looking like a good city right about now) who hosts a web YouTube called “Minimalist Mondays. ”
Next, Brian showed me his very own foot treatment. Practicing what he preaches. Doing his own exercises.
Finally, he read my blog. Not all of it, but some of it.
Wow. Mind blown. Thanks, Brian.
Actually, that wasn’t all. I mention that my knee is super crunchy when I do the active hamstring stretches, and he pulls out a mini plunger and some of the ultrasound goo to help make a good suction area. Before we use these things, he shows me how to move my kneecap around to help mobilize it. Then, after noticing how it likes to move down, but not so much up and especially not up and to the right, he squeezes the goo out and begins to plunge my knee. It’s like having traction done on your kneecap, and it feels amazing. He explained that this would help to lubricate the joint as well as encourage more circulation to the area. There was also a bit about the neurological factors involving isometrics and cramps, but it is late. More on that, perhaps later.
Next, he ASTYM’ed my ankle and calf muscles. The right heel where the Achilles Tendon attaches hurt a lot more than the left. Really, everything on the right side hurt more and was crunchier (definitely a scientific term).
He showed me how to massage my tendons and muscles between my big toe and the other toes. This increases the big toe’s flexibility and ability to move out and increase the width of my foot. Oh, I guess I forgot to mention that the wider the foot, the better! Take that shoe industry! Where are my WIDE toe boxes???
I also learned how to stretch the top part of my foot and use a baseball to help increase the flexibility under my forefoot or help the arch that should be there redevelop.
So, now I’ve got 5 exercises!!! I think we’re getting somewhere 🙂
8/23/12 – New Physical Therapist
I showed up to the new physical therapist not too sure what to think or do with myself. I always have somewhat of a haughty speech prepared. You know, I have this foot problem. It’s always been a problem. I know SO much about it. -Insert diarrhea of the mouth here.-
Over the past few months, I’ve been thinking/analyzing my approach to transitioning to minimalist. Specifically, I’ve been pondering how I present myself to others when talking about the strengths and benefits of going barefoot. And I decided that I sounded like a crazed advertisement on the Home Shopping Network or something.
Well, that’s not the look I’m going for. As a matter of fact, that’s quite the opposite.
So, when I sat down with Brian Crosier, the PT at Madison Physical Therapy, I decided to be a little more tactful. I let him ask questions, and I did throw in the extras like the club feet and a little bit of history. Of course, I also plugged my blog.
He then did the usual tests. This time, the numbers:
Ankle Dorsiflexion (ability to bend in ankle) in knee extension (knee out straight): L 4 R 7
Ankle Dorsiflexion (ability to bend in ankle) in knee flexion (knee bent): L 6 R 9
And I quote, “These numbers suggest you have both talocrural joint stiffness, and soft tissue restrictions limiting your ankle dorsiflexion range of motion. This will result in your posterior tibialis needing to engage early in your stride, one of the several things that will lead to increased loading of that tissue.” Cool!
Knee to wall test (consequently, Travis did this test with me in one of my final appointments with him- not sure what those numbers were. I’ll look it up and edit)
Left: 8.5cm (cheating by allowing my talus or arch area to drop and make up for the stiffness), without talus dropping (Brian pointed out the cheating and directed me to not let the arch drop resulting in a smaller number than the right foot!), 7cm.
Right: 8cm
Goal: 10+cm on each foot
He then told me to do two exercises. TWO exercises? Is that it? I mean, I’ve got healing to do. Isn’t there more?
“No,” he replied. He then said very matter of factly, that it was obvious that I like to overdo it. I mean, I was walking right back into PT. Touche.
So, I have a specific exercise for the posterior tibialis and an active hamstring stretch. 🙂